Welcome

* * * Canadian Craft Federation / Citizens of Craft.ca Podcast Series! : ) I'm in Episode #4... but you should listen to them all. : ) LISTEN
Showing posts with label Saturday Stitches. Show all posts

Saturday, 1 March 2014

Saturday Stitches - Twisted Chain

Hi everyone!  Welcome to Saturday Stitches, where I explore basic embroidery.

Saturday Stitches Tutorials @ My Sweet Prairie

Today I want to show you a variation of Detached Chain (lazy daisy).  Often when I teach this, one or two students will accidentally twist the loop and end up with crossed threads.  OR - you can do it on purpose and call it Twisted Chain!  : )   That is an actual embroidery stitch, so why not use it?

If I keep going, this will look like a purple thistle top!

You can find the Detached Chain HERE.  You can find all Saturday Stitches HERE.  Enjoy playing with this one!  Try it short-looped, long-looped, or make the anchor stitch nice and long and you have grasses! 


Experiment with yarns, variegated threads, even silk ribbon.  (I am using a 12 weight variegated cotton from Wonderfil Threads in this.)

Happy stitching!  Share & Pin if you like.


Saturday, 22 February 2014

Saturday Stitches - EASY Threading & Knotting

Welcome to Saturday Stitches @ My Sweet Prairie.  To find all tutorials, click on the tab at the top of my blog.


Guess what?  I have a video for you!  It's true.  In shock?  So am I.  : )  My lovely assistant Kari filmed this last summer.  I did hours of editing for a one minute video.  That was a big learning curve.  If it goes too fast, just pause it or rewatch.

This video is made for everyone who finds threading a needle to be incredibly frustrating.  I show you how with a terrific method that has been around for a long time.  No tools, no gadgets, NO LICKING your thread, no slobbering on your needle.  haha.  If the eye of the needle is the right size, you can thread strands of floss or even yarns in a second with no troubles.  Everyone should know how to do this.


If you are unable to view this video here on the blog, you can go to youtube directly via THIS LINK.

If you are still having trouble getting the thread or yarns through, then likely you need a bigger eye.

Enjoy!


Saturday, 15 February 2014

Saturday Stitches - Scroll & Coral

Hello!  It's Saturday once again.  Here's a small installment for Saturday Stitches.

Click to see all Saturday Stitches past.

Here are a couple new stitches I did, but I have not yet applied them. The first is the Coral Stitch.  It is worked right to left.  PLEASE NOTE - on Aida cloth, it looks much more open lined.  An alternative name for it is the German Knot.  Clearly - mine doesn't look like a knot at all when it's spaced out in this way.  It's also called beaded stitch.  That would tell me that it should look more like a bump where the stitches take place, and not like a long fence.  I will have to retry this... (or you can!).


p.s.  The laced running stitches were shown before.  I'm using cloth wisely : ).

The next one turned out really neat!  It's called Scroll Stitch.  It's worked in the opposite direction.


It's unbelievable simple and I really enjoy the curls in it.  Very nice.  I wonder what rows and rows would look like in a field?  hmmmm.  Both would be lovely in a border for sure!


I do LOVE the detailed swirl it creates - like teeny waves, though from afar it looks like an evenly textured line.  I'm going to go work some more on these.  Thanks for popping in!  See you next Saturday Stitches, and feel free to pin the tutorials if you want.


Saturday, 1 February 2014

Saturday Stitches - Feathered Chain

Welcome back to Saturday Stitches!  : ) 


Today I want to show you variation on the detached chain stitch, often referred to as 'Lazy Daisy'.  It's easiest for me to work right to left with this one though I am not sure if that's correct or not.  In truth, I'm turning my cloth around a lot to get this border-effect.  It's pretty confusing at first but it's really pretty once you make a whole row of it. 

You come up at A, then go down again at A.  Leave the working thread loose so you have a loop.  When you come up at B, you essentially hook that loop you made.  That is how it gets anchored.  Then you go down at C, working diagonally down.


It's best not to weave the needle through the Aida cloth like that as it's hard on the threads and can distort the cloth.  I chose to set up the photo like that so you could see where to go down, and where to go up in one image.

The next detached chain will go diagonally up.  See how point C from the diagram above becomes point B for the next set of stitching?  It makes a beautiful row of stitches, especially with variegated threads.  If you can break it up to see each chain & stem, then you can see how it's spaced.  Again - I love practicing on the grid of Aida cloth, especially with something so geometric.


So above, you will go back in at A (don't pull the thread all the way through - leave a loop), and then come up at B, with the needle inside the loop in order to anchor it and create that daisy petal shape.  Then the stitch is put back in at C to create the stem.  From here, I can play and 'get loose' with the stitches... making them look more natural and organic.  You can also play around with combinations and colors to see what becomes of it!  Enjoy.


Thanks for swinging by!  : )  I don't mind if you Pin the tutorial images.  To see all Saturday Stitches, simply click on the Tutorials tab at the top of my blog, or use the search box in the top left corner.

Have a great day - and Happy Year of the Horse : )


Saturday, 25 January 2014

Saturday Stitches - Running, Darning, Lacing

Hello!  Welcome to Saturday Stitches - a weekly embroidery tutorial.  Remember, if you are looking for any other stitches, you can type in the word you want into the search box at the top left corner of this blog.

Link to all Saturday Stitches posts here.


Thanks for the comments last week!  I'm glad you liked the Aida cloth tip.  Today I'll show you variations of a single, simple, plain old stitch.  Here is the running stitch - simple spaced dashes.  They make great quilting lines if you want to add stitches to your modern quilts.  In decorative embroidery, they serve as a foundation for weaving, interlacing, and even attaching crocheted borders.  In this photo below, I am using a double blunt ended needle.  I know that likely looks odd.  When you do any type of weaving or lacing with a sharp tipped needle, remember to simply turn the needle around and weave with the blunt eye end.  This way you can avoid snagging the threads and the fabric as you slip the needle under the stitches.


The Darning Stitches are essentially masses of running stitches, with the spaces typically smaller than the stitches.  Rows of these were used to secure fabric that was falling apart (is - darning hols in socks).  In artful stitching, these make great filler stitches for fields, walls, buildings, and backgrounds.

I took out a mixed fibre pack and attempted to play around with these in an abstract way - three stitches at a time but a little wonky.  It's not really my style but it was an interesting experiment.


See you next Saturday for more!  Happy Stitching,


Saturday, 18 January 2014

Saturday Stitches - Chain

Good morning!  Welcome to Saturday Stitches, where you watch me learn formal embroidery stitches.  You can find all the Saturday Stitches tutorials in the tab at the top of my blog.  And YES - you can Pin these images.  : )


Here is the Basic Chain stitch.  The trick is to have the stitches inside the loop of the last chain, so they link together.  (Excuse these first 2 photos - they are OLD.)


You can also do them on an angle like this:


See how you begin and end the stitches inside the loops?  It isn't recommended that you weave the needle like this.  In my guild (Bridge City NeedleArts - EAC) they suggest you stitch up, stitch down, stitch up... It keeps the stitches cleaner looking.  You have less twisted threads, and you avoid distorting your cloth.

A good way I like to practice new stitches is to use a grid, or Aida cloth.  See the photo below?  It makes everything straight and if you make a mistake, it's easy to see where you when wrong.


Aida cloth is also a great way to practice putting together stitches for crazy quilting border designs.  It's great to try different colors of threads, different weights of threads, and different fibres (silk, cotton, variegated, ribbon).

Below is one more variation of the chain with an open end.  It creates a wider chain that resembles a ladder.


It's like a quilt pattern.  Depending on the colors and fabric choices, you can make completely different looking quilts.

Incidentally, did you notice my needle?  I just got it and I love it!  It's a double blunt-ended cross stitch needle with the eye is in the middle.  It's actually very nice to use.  It was weird fot me to go back to a regular needle.

Here is the beginning of a sampler of detached chain stitches using a bit of everything from my fibre packs.  I started with the heaviest fibres first, and used the thinnest last.  Each cluster has three detached chains worked out from a central point.


Quite useful on quilted postcards or pillows or needle cases...  : )  or ...the backs of mittens, the lower border of a curtain, etc etc.

Have fun!


Saturday, 11 January 2014

Saturday Stitches - A 2014 Comeback!

Good morning!  I'm posting to let you all know that I will be continuing with the Saturday Stitches tutorials!  Saturday Stitches was a series of posts I started when I decided to learn formal embroidery.  I wanted to expand my stitch bank to have more options in my art.  That was around the time I joined the Bridge City NeedleArts Guild (Saskatoon), and the Embroidery Association of Canada (EAC).  It was also the time when I began stitching with Margot Lindsay.  As I learned each stitch, I posted them as tutorials where you got to watch me teach myself (and make mistakes along the way!)  Those tutorials evolved into the first Winnipeg class Come for Tea and Stitch With Me.  Now it's tweaked pretty well.  I've incorporated silk ribbon stitches into the class.  My hopes are to run workshops exclusively on silk ribbon embroidery.  I LOVE ribbon and use it a lot. So enjoy - I'll redo some stitches now that I have a better camera, and introduce a lot more stitches too.  (And * * * YES you can Pin any of the tutorials* * * .  No problem!)


You can find the original Saturday Stitches posts HERE.  Anytime, you can also click on the TUTORIALS tab at the top of the blog and find it there as well.  With each stitch, I try to show variations and applications.

The other thing you can do is type in search words at the top left of this page.  For instance, you can type in Sorbello Stitch, and posts tagged with that stitch will pop up.  *On that note, almost all of my posts are tagged with key words.  I have well over a thousands posts on this blog, so please help yourself and look around!  There's lots to read and look at.  ; )  Go ahead and try it out!  Any comments on old posts still come to my email, so I will see them FYI.

Talk soon,

Saturday, 16 March 2013

Saturday Stitches

It's been a long time since I've done a Saturday Stitches post.  For those of you who are newer to my blog, I ran a photo-tutorial Saturday post where readers could watch me teach myself formal embroidery.  I had forgotten about those posts!

all Saturday Stitches tutorials link HERE

Last week I was able to visit with Margot (my stitch mentor).  It's been soooo long!  In fact, it's been too long.  I'll blame it on winter.  I was able to stay longer than usual at her home this time and we had such a great visit!  I am so thankful.  She is one of my favorite people on earth.  There's one stitch she showed me that I had never seen before.  It was in a Jan Beaney / Jean Littlejohn book.  It was an older book - black and white and quite horrible to make out, but right away I saw evergreen trees.  "Oh!  What's that!?" I asked.  Margot said it was the Thorn Stitch.  Away I went...

a few clear samples / variations of the Thorn Stitch

I can see this being very useful.  I won't get into step by step instructions because I think this is pretty straight forward.  You begin by stitching a long center line, and then you simply stitch cross-hatches over it.  Image a piece filled with layers and layers of all sizes of threads and yarns and floss.  It would look like a forest!  You could make the trees tall, thin, and sparse.  You could make a low, dense treeline.  The various sizes of fibres give a sense of depth and layers.

There you go - Saturday Stitches once again.  ; )  If you'd like to see more Saturday Stitches, go HERE or click on the Tutorials link at that top of my blog.

Happy Weekend,

Saturday, 26 May 2012

Saturday Stitches -> French Knots, part II

Hi!  Welcome back to Saturday Stitches!  This is my collection of embroidery tutorials as I learn more useful stitches for my work.

Click HERE to see all Saturday Stitches posts

Lately I've had requests from a couple of people for this post. (Thank you!)  With all the french knots I've been doing, it was suggested that I show how to get the different sizes of knots.

Canola Summer, 2012  (detail)

It's so simple to do!  I'll show you.


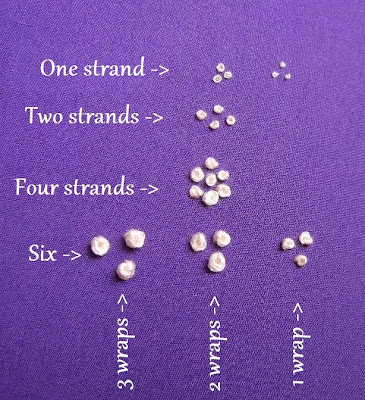
* From top to bottom, there are examples of how the size changes by the number of threads or strands you use at once.  You can even use yarn.  Heck - you could use a shoelace!  Basically, the knots will be bigger if you use thicker threads.

* From left to right, there are example of how the size changes with the amount of times you wrap the same amount of thread around the needle as you embroider.  For me, three wraps is too lumpy and chunky, though that has it's applications for sure.  One knot is very much 'a knot'.  I nearly always stitch a French Knot with 2 wraps because I like the way it looks.  It has more of a donut or nest shape and it's easier for me to get them looking uniform.  For teeny specks like snow or stars, one thread with one wrapped knot is also shown... VERY VERY small.

* There are other ways you could change the look of your knot, like by wrapping looser to create open loops.

Wolf Willow & Prairie Lilies, 2011 (sold)

So there you go!  If you need a French Knot refresher, click the Saturday Stitch post HERE for the tutorial.  You'll see it at the end of that post, so scroll through.  To see all Saturday Stitches posts, go up to the My Tutorials section in the menu bar at the top of this blog. Bye for now!


Saturday, 18 February 2012

- - - Saturday Stitches - - -

Hi!  Welcome to Saturday Stitches : )  Here's another installment of me learning embroidery.

You can find all 'Saturday Stitches' posts in the blog header under "My Tutorials"

I'm glad you all liked that stitch from the last post!  I didn't want to do a show & tell until I know what it was called.  Found it!  It's a knot called the "Sorbello Stitch".  It's not in any of my books, but I did find it online to ensure I have the spelling right.  I did this on a weird surface that I wanted to look like snow.  It's a dryer sheet.  I said to my husband, "LOOK honey!  Doesn't this look like a snowbank!?"  His slow reply was, "it looks like a dryer sheet".  LOL  Oh well.  Ya can't please everyone!  If you are trying this out, it's easiest to use a short needle because of all the maneuvering there is.  This stitch takes four times as long to do as a French Knot.  But it's easy, and was perfect for what I wanted.  So here goes.  First, image four points like the corners of a square...


Saturday, 11 February 2012

- - - Saturday Stitches - - -

Welcome to Saturday Stitches, where you watch me learn embroidery stitches!  You can find all Saturday Stitches posts in the "Tutorials" link at the top of my blog.  Enjoy!


Yesterday, I went to stitch with Margot.  She was awesome - had everything set out including books and various sized threads.  I came away with a Bullion Knot!  I tried it before and sadly failed.  This time, I nailed it!  : )  Awesome.  Thank you Margot.  Cat tails, here I come!

Start like this.

a long enough needle is helpful

easy does it.

then back down where ever you want

Tada!  There you go.  You can make them as long or short as you like, with as many or little wraps as you choose.  If you wrap ten times onto a long ending stitch, it will look like a cat-tail.  If you wrap ten times on the perfect length, it looks like a wormy.  : )  If you wrap ten times and don't stitch far at all, then it loops itself, which would be very pretty in a floral piece perhaps!


Have a good one!
: )

Saturday, 4 February 2012

- - - Saturday Stitches - - -

At the last meeting of the Embroiderers' Guild, I was given a little project to take home.  It was several candlewicking pieces that required only Colonial Knots.  I had never heard of that before, so I learned it and now I'll show you!  : )  So welcome back to another edition of 'Saturday Stitches' where you watch me teach myself to embroider!

you can see all posts by clicking on 'Tutorials' at the very top of my blog

A Colonial Knot is a little different that a French Knot.  It doesn't make that little doughnut.  It makes a good tied knot but wrapping the needle in a figure eight.  Check it out...

bring the needle up, and then lie the tip over and under the thread like that...

Take the working thread and put it across the tip of the needle and then tuck it under again.

put the needle back into the cloth, close to where you first came up

Pull to tighten the knot a bit and then take the needle right through to the bottom.


And there you have it!  It's pretty easy.  They sure look lumpy and knotty compared the the French Knot.  They would work great as pebbles in a small landscape I bet.  hmm....


Have a great weekend!
Related Posts Plugin for WordPress, Blogger...

* * * Here are some of the most viewed blog posts this month * * *