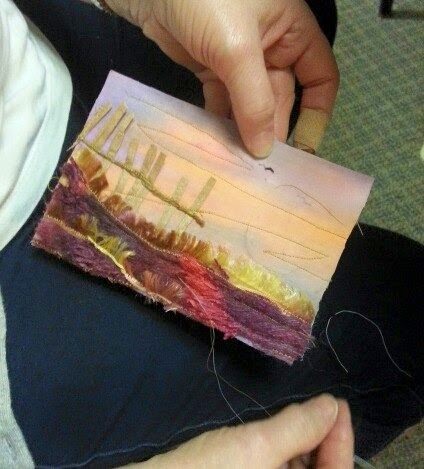
Welcome

* * * Canadian Craft Federation / Citizens of Craft.ca Podcast Series! : ) I'm in Episode #4... but you should listen to them all. : ) LISTEN
Showing posts with label postcards. Show all posts

Sunday, 28 May 2017

Postcards To the Station, Postcards At the Station

If you are settling in to some spring / summer sewing projects, I'm going to let you in on a very fun Call for Entry. The Kathy Theissen Gallery in Rosthern, Saskatchewan did this last year andit was such a hit that they are doing it again.  Anyone from anywhere in the world can mail a maximum of 2 postcards each are 4x6 inch pieces of art.  All entries will be displayed as an Exhibition, and auctioned off as a fundraiser for the Station Arts Centre.  So... you don't get them back, but you do get them on display and spreading joy.


Here are the details they posted:

We are receiving POSTCARDS TO THE STATION, a Postal Art Fundraising Exhibit, well before the deadline date. If you have 'liked' some of the postcards you have seen, you might want to send us one or two as well. Here is how---


What are the rules? 
Create a 4”x 6 “ work of art on the surface of your choice. All media is welcome (text, paint, print, fibre, photography, collage, leather, metal etc)
Your Art Work must come through the postal system (stamped by the post office). Limit of 2/person. Sign it on the front, indicate the title, medium & your contact information on the back. Your card must arrive at the Station on or before Friday June 16, 2017.

Station Arts Centre
Box 1078
Rosthern, SK, Canada
S0K 3R0

Who may participate? 
Emerging artists, professional artists and YOU… if you love a challenge!
Work posted to us will be part of a silent auction & exhibit in the Kathy Thiessen Art Gallery from June 27 to August 6th, 2017. 

The work is viewed in person and on Facebook.

YEAH!  DO IT!

And if you are too chicken (tsk tsk) and you'd like to try your hand at making a fibre art postcard, I'm running a class in Rosthern during the postcards exhibition, so you not only get to make your own, you get to enjoy a collection of cards on display from around the world.


Open to all.  Any sewing machine in good working order is required.  You need some assorted threads and a bobbin loaded with white.  I bring all the fun stuff.  We'll have a theme and you get to do your work creative thing... so come with an open mind.

YAY!

And I have another secret...  but you'll have to wait for the next post.

: )

Tuesday, 17 November 2015

Postcard Fun, Take 2

Yesterday, the cold wind blew in and the day became rather blustery.  Still no snow, but you can finally feel things changing.  I had a postcard workshop in my home studio yesterday.  Because my fabrics were still divided by warm and cool colours, I went with the theme of Hot & Cold once again for this group.  It was a little vague for a first time theme, but I think folks enjoyed the fabric play nonetheless.

hot and cold theme

These (above) were made by two women at opposite ends of of the classroom.  The first was about staying warm in the winter, and the maker spoke about her fond memories of cross country skiing.  She said they would stop to build a fire and heat up some hot chocolate.  I love that story.  What a great experience!  This card isn't quite finished but the feel of it is so magical.

The second card (above) is so cute how she has one tree decorated!  She worked to use hot and cold colours.  She did quite a lot of couching with the warm coloured yarns.  How clever to use them as strings of light!

high contrast colours

The card above is pictured here in progress.  She was wanting to stay in Autumn mode since winter isn't really here yet... but she went all out using hot and cold colours in her fall leaf scene.  You can really see how the cooler greens and blues recede and the hot reds and orange come forward and visually pop right off the background!

The nest one made me laugh.  It's 'naked snowmen on a beach'.  hahhah  Yup.  So she used the hot and cold in her image as well as her fabrics.  Every time she said 'naked' I yelped and covered my eyes.  lol

soaking in the sunshine

This last photo is too cute.  I think she started out abstract, just piecing very different fabrics together, some warm, some cool.  Eventually, she realized it looked like a camera.  So that's what she did!  It even has a strap attached.  How creative!  She added black plastic for the shiny viewer, and buttons for the buttons!  : )

Say Cheese!

Thanks Ladies!  I'll see some of you soon again as I get ready for the Threadpainting Class this afternoon.  : )


Monday, 16 March 2015

Spring Retreat THANK YOU

I'm back!  I was just outside of Wolseley, SK for a few days with the most wonderful group of quilters and crafters.  The Tiger Lily Quilts shop organizes retreats several times per year.  I was called to teach for the weekend.


I met Liz (the owner) while driving back and forth to Winnipeg 2 years ago.  She has been pestering me to teach ever since.  I have been procrastinating ever since.  Believe it or not, I am such an introvert.  A three day retreat scares me.  I get so nervous thinking about entertaining people for days on end.  I get my batteries recharged through solitude.  In the back of my mind, I told myself, 'this is the last time.  Then I stay home and create.'  Silly, right?  It was the BEST teaching weekend to date.  I had such a good time.  I came home with a happy heart but pouting because i didn't want the weekend to end.  ; )


The first afternoon was Postcards with the Challenge Theme being SPRING!  Birds & nests, flowers, and landscapes were a common theme.  Liz just came back from vacation to she couldn't help herself.  She did the underwater ocean scene at the bottom.  She tried to convince us it was the prairie, but we know better. : )

lovely quilted landscapes with layering and embellishing

The second afternoon was the Threadpainting class.  I've been teaching both of these classes for six years now.  As usual, the women had a range of experience - from those who had never done free motion, to those who have threadpainted lots before.  I once had a student who didn't even know how to thread a machine!  I tailor my classes so that everyone starts on the same foot with the same information, and everyone including the experienced threadpainters learn new things.  This particular group were really great at the longer stitches I teach.  I personally love to see that.  Here is someone working on her project who has lots of background with free motion.


Beautiful.  Beautiful, beautiful.  She used all threads with sheen.

You have to see this next one.  It's been getting overwhelming attention on facebook.  : )  One of the participants sent me this image of her finished project.  It was her first attempt at threadpainting AND she had an injured arm - She wore a sling all weekend!  Isn't that incredible!?

way to go TANYA ! 

Truth be told, everyone's work was fabulously done.  It's not often I get to see the fully completed piece.  I love how she finished the branches.  It is so lovely.  Check out all of the blending!  Super.  I think it's had over 2000 views and nearly one hundred comments on my FB page.  : )

On the last night of the retreat, I gave a brand new lecture for the first time.  Usually I do a trunk show of what I do, or a retrospective slideshow of how I developed my art and what inspires it.  This time however, the talk was on Landscapes.  Specifically, I explained about getting the most out of your own photos to use for fibre art, whether you have a high end camera or an outdated cell phone.  It irks me when people use other artist's images and compositions.  Everyone has their own photos.  This talk was all about getting the most out of your images, even the ones that you feel did not work out at all.  I spoke about composition, cropping, lighting, points of interest, perspective, basic computer editing and how taking risks to capture images is well worth it.  It was a very fun talk, and there were several women who stayed after to discuss this more.  We went through their phone ipad images together and made some incredible discoveries.  I showed them how to make new pictures from old ones.  It was powerful!  There was a lot of emotion when they were able to see the original scene with all the light and colour they remembered.  It sure ignited some creative passion to confidently move forward and create art.  I think this is an invaluable class.  I will definitely be fine tuning it and offering again and again.  I know I've been told so many times that great art begins with great photos.  I'm glad I could show them how to do it themselves.

another beauty from Sutherland Beach in Saskatoon

So, now I'm home again.  I had never been to a full 3 day quilting retreat before.  I'm still digesting it all.  *Pun intended*  We ate like queens.  If you ever get to attend this particular group's retreat location at Circle H Ranch, you will not be disappointed.  It was an incredible dining experience.  I expected to drop a couple pounds, but I gained 4.  (Haha - I suppose that's not great advertising but we could all stand to take a few extra walks, right?)  Liz brings her quilt store goodies with her, so we were all able to shop on site.  It's advertised as a craft retreat so there was not only quilting, but ladies doing polymer clay dolls, fondant, scrapbooking, felting, and me - I brought my hand embroidery.  : )


No regrets!  I am going again as a participant.  That ranch setting and the wonderful food and socializing was just too fabulous.  We even enjoyed the return of some Canada Geese.  Happy Spring, and thank you so much Liz.  It was great to get to know you better.

Have a beautiful week,


Monday, 12 January 2015

Prairie Postcard Love

I'm like them here, I like them there, I like them any-any where : )


Prairie Postcards straight up, or flat out...


Some more finished ones...


I hope you had a terrific weekend!


Tuesday, 2 December 2014

A Guessing Game Giveaway!

Here we go!  

It's been a while since I've had a giveaway.  Remember back in the spring, Brandie Lynn Maslowski did an interview with me on Quilt Talk Radio?  I was all about Fibre Art Postcards.  She later organized a Canada Day swap with a Maple Leaf theme.  Since then, Brandy Lynn caught the bug big time and has organized more postcard swaps via her site!  : )  At the end of the summer, we submitted information to Quilter's Connection magazine.  Hers was an article about hosting a swap and the love of postcards.  Mine was project instructions for making and sending postcards.

It's here!  Hot off the press.

cover art by Pippa Moore

This entire Canadian quilting magazine issue is devoted to art / artfulness.  Here is a peek at Brandy Lynn's.  5 pages and lots of samples!


I was really surprised to see 5 more beautiful pages they printed for me as well!  Being in between studios, time was tight and resources were scarce.  I could not provide samples of my own.  So I asked the makers of a handful of my favourite postcards if I could send those in to be photographed. I have received these through online swaps.

I'm so glad I did!  So, congratulations (and thank you!!) to Sheila Munro in NS (5 images), Vicky Baker in AB (1 image), Cheryl Coville in ON (1 image), Judy McCrosky in SK (3 images), and Mary Anne Kingston in ON (2 images) for contributing to have your wonderful postcards make it into the pages of the magazine.  And it looks like all your names are in there too, spelled right.

Quilter's Connection Magazine - Winter 2014/2015   Pages 18-22

To celebrate - a give away!!  I have 2 prizes each of a 1 year DIGITAL subscription to this magazine, courtesy of Quilter's Connection.  I know not everyone prefers the digital version, but if you are like me, you have piles of magazines and still manage to spend most of your time on the computer. ; )  It's not so bad, and it's free!  All you need to do is say hello in the comments and give me a number.  The two closest guesses to how many postcards I have received from around the world will win the subscriptions.  ONE GUESS per entry.  Enter as often as you want.  (HAHA this should be fun!!)

You have until the end of this week to guess.  I'll announce the winner on Saturday, December 6th, 2014.  Good luck!  I guess I had better get counting...


Tuesday, 11 November 2014

Sending and Receiving.

Hello!  I've been finishing up pieces that sold from the open studio and getting them off to their new owners.  I made one delivery out to a farm.  It was great to take some photos.  It was sunny as I bundled up, but as I drove out, the sky clouded over for the rest of the day.  Oh well.  I got this image which I think is awesome.  I don't think I would stitch it, but I love the spooky view.


It wasn't foggy out.  There was a very fine snow falling over the land.  I love the way things just disappear into the distance.

I finished up a piece for a woman who spied a sample at my studio that was not for sale as it was in progress.  She fell in love with some silk work I had done, and asked if I could stretch-mount it as is without a frame.  So that's what I did.  This is only the second time in five years that anyone has specifically asked for no glass.  I thought that was pretty cool.  I ended up using a stiffening starch to maintain the cheesecloth.  I got the idea from that cheesecloth starched ghost I was showing you.  We discussed various ways of keeping it in place.  I could have stitched it down, but that would change the look.  She liked it just the way it was.  It worked out so great - I'm really proud to send this one off now.


 Here is a detailed shot of how it's mounted.  I did clean up all the lint fyi.  ;)


When I got back home, I had a postcard waiting for me!!  It's from Michelle Eaton with the St. Albert group that I ran a class for in May.  That's awesome!  It even came with a 'Haunted Canada' stamp on back.  Spooky!


It's such a beautiful pop of colour, isn't it!?  Awesome. 

And hey!  If you are interested in joining a postcard swap, Brandy Lynn has one open again.  (She did the Canada Day Maple Leaf swap earlier this year after our postcards podcast.)  This round, the theme is Snowflakes!  *  You can sign up as many times as you want.  It's free.  If you sign up three times, you'll get three quilted snowflake postcards in the mail.  You just need to buy stamps.  How cool is that?  : )  Sign up & info is at the very bottom of her page HERE

Have a great day everyone!

Wednesday, 5 March 2014

What I Have Been Working On

I have been up to my ears in these colorful mini landscapes.  I'm nearing Prairie Postcards #200 soon!  I can't believe there are this many.  I have been making a batch for this series every year for four years now.


work-in-progress photos - ready for trimming

piles and piles of prairie postcards

They are done now!  I cleaned them all up, numbered them, and signed the backs.

Tada!


You can find them in my Etsy shop for a limited time.  I dusted that poor place out just for you.  : )


After spring officially arrives, I'll transfer them to the SCC Boutique here in town.

For now, they are available online only & the shipping is free.  : )


linking to WIP Wedensdays @ TN&TN

Tuesday, 18 February 2014

It's Postcard Time!

I'm in a postcard frenzy - whipping out some bright colors in anticipation of the end of winter.  I am highly motivated by the onset of spring. So.. about 75 cards in the making.  These will be for the SK Craft Council Boutique, and I'll likely frame some up for shows I have before the summer.


The color schemes are put together - no two alike.  Now I'm addign the stitching, mostly simple machine work and some couching.  This is my fave - fabric from my friend Carmen (LOVE this color to no end!!).


Sheep in some.  Birds in others.  Then it will be a couple of afternoons doing backings and edges.  (A couple or three...)

It's a beautiful day - BEAUTIFUL!  So for this afternoon, we are out to play!  : )

Linking up to WIP Wednesday @ TN&TN.  My apologies about the font & format - not sure what happened.  Inlink changed, I didn't.  ?  hmm..
Have a super day everyone!

Friday, 27 December 2013

New Flickr Group - You are invited : )

You know I am a huge fan of fibre art postcards!  I've been running my Creative Quilted Postcards Workshops since 2009, and have personally made hundreds to swap and to sell. 

scrappy Christmas card

The other day I was searching around on Flickr for a postcard group.  Not having any luck, I decided to go ahead and start one.  Why not?


So I did!  You can find it here:   Fibre Art Postcards on Flickr


It's an open group.  Anyone can add photos of their 4x6" fabric cards.  There are a few rules, but they are pretty straightforward.  You can find them at the site.  If you have fabric postcards on Flickr, I invite you to join.  Who knows?  Maybe you will make some great friends for swapping cards around the world. 


If you don't swap postcards or have a Flickr account, you might enjoy looking through the gallery for sheer appreciation.

Pass it on!

Creative Quilted Postcards Workshop  via Shirley's Sewing Room


Wednesday, 26 June 2013

Postcard Framing Tutorial

I was framing up some Prairie Postcards this week for someone who wanted to purchase them as art.  I thought this would be a great opportunity to create a tutorial for those of you who might like to display your fibre art / quilted postcards as well.  It's easy to do.  First, you'll need frames...

lots of styles, lots of options

I have a lot of frames that I either bought from garage sales, or purchase at craft stores.  Before you put art in a frame, it's a good idea to 'audition' frame colors and styles by simply setting your art on top to see what it would look like.  You'd be surprised how many times a great frame washes out or clashes with the piece you are wanting to put on display.


The way I like to display postcards is to mount them on a backboard and matt them.  You will need to ensure that the matting you chose will be larger than the 4x6" art.  It's nice to let it breath and have some room around the edges.  In the case of my postcards, I put an equal amount of energry into the edges, so I don't mind showing them off.  If you are buying pre-cut matting for a craft store, take a look at the corners.  Over-cut matting is a 'no-no'.  If you don't have a choice, you can try to press the over-cut lines down to make them less noticeable.

back board, mat (pictured face down), acid free archival glue, rotary cutter, cutting mat, ruler, spacers.

To mount, you have lots of options.  You can stitch your fibre art to a backing cloth and then stretch that over the backboard.  You can do the same with a stiff watercolor paper.  You can also mount directly onto acid-free mat board with an adhesive.  Here as well, you have lots of options.  You can buy mounting tape, double sided sticky tape, velcro/hook&loop mounting tape, or you can use fabric/paper glue in small dabs.  * * * Ensure that anything you touch to your art is archival quality / acid free.  Read labels.  Try different things.  See what you prefer.

I like to use the paper in the frames as a guide as to how large to cut the back mounting board and the mats.  I don't keep them in the frames, I just use them as a guide.  I do all my cutting with my quilt rulers, cutting mat, and rotary blades.  I have an extra marked 'paper' since they go dull faster when cutting things like this.  Rotaries and rulers make nice, straight, clean cuts.  You can also use an Exacto-knife if you have that.

clean clean clean

Fine embroidery tends to be the only fibre art that is put under glass to ensure longevity and protect delicate threads & intricate handwork.  I put these postcards under glass as requested by the buyer.  If you chose to use glass, you will need to clean it well.  When it comes to little art, people look closely and so bits of dust or debris can be really obvious.  Microfibre shammies work well.  Do not use cleaners so that you can ensure that all the parts to the framing remain acid-free.  It's handy to work in thin cloth gloves to keep natural finger oils off the matting and fingerprints off the glass.

It's really important that fibre art not contact the glass when framed this way.  There are options here too.  You can double up your mats.  Sometimes they come precut this way as well and feature a secondary color.
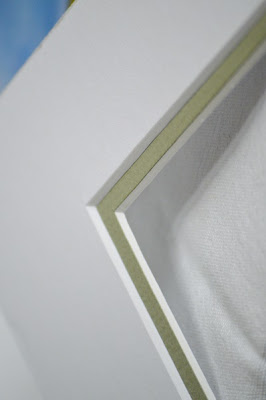
pre-cut double matting from the craft store

I've also seen them raised so that the two mats have a spacer between them.  I make my own 'floating mats' by cutting up spare matting into 1/4" / 0.7cm strips.  I glue those first to the underside of the matting like so.

creating a floating mat to keep the glass off the fibre art

I like to put a dab of acid free glue to the mat before I place it on the backboard around the art.  The reason for this is to prevent shifting during or after framing.  There's nothing more frustrating than putting some are together and then finding it's all crooked and you have to take the whole frame apart again.  (haha - from someone who knows...)  Also, turn the piece to see that the space around is consistent.  If you have one light source in the room while framing, shadows can throw you off.

raised / floating mats to protect the art cards

Sign it!  Sign your art.  It's important.  Could you imagine reading a good book and the author failed to leave their name on their work?  Sign it.  Date it too.  I do this on the art, on the matting, on the back of the matting, and on the back of the frame.  Artists/painters generally sign on the lower right.  Quilt back labels are put on the lower left so that when it's displayed, you can flip that lower right corner and find the creator's name there tucked behind.  Smart, huh!?  : )

framed postcards, signed art

I learned from my framer to wrap pieces individually and stack them face to face and back to back.  This way, protruding hardware cannot scratch up the fronts of other frames.  You can get the brown paper on rolls from post offices.

ready to go.

This is basic, basic framing.  You can get brad tools and replace all the hardware with proper picture hanging parts.  Most cheap frames have weak saw-tooth hangers and do not hang well.  They are also a no-no when hanging at shows.  (Read the fine print before you enter anything.)  After all is said and done, I have to tell you that I definitely prefer professional framing.  I've had cheap frames fall right off the walls.  It's also tough when you make art and then try to find a frame that fits!  I've learned to make the art fit the frame.  Postcards are easy though - at a standard 4x6" you just use a frame with a 5x7 cut space or larger.  If you are framing for yourself and not for a buyer, then this DIY should do.

this one was professionally framed

I find professional framing isn't that much more costly, especially if you stretch or mount your own work.  Well there you go!  I hope you enjoyed my little tutorial.  : )  Postcards are meant to be loved and displayed.

Enjoy! (and yes you can 'Pin' from this post...)

Related Posts Plugin for WordPress, Blogger...

* * * Here are some of the most viewed blog posts this month * * *