
 |
| out my kitchen doors... |
With the kids in school all day and my classes ready to go, I have been getting so much done. I have THREE more threadpaintings started. The photos that have been hanging on my inspiration wall for a year, waiting, are all being drawn up with thread now. Oh - it feels good! It feels very easy too since I've been staring at the photos for so long. Many of them are already sketched out onto paper which makes it all the more simplified.
 |
| Jackfish from Day's hill, 2012 |
That photo for instance... it has been nagging me ever since I took it. I don't love the barbed wire. I didn't even know there were little blue flowers in the field until I tweaked the contrast on my computer! I was quite thrilled. I sketched it out with pastels this spring and hung it on the wall. I decided this was it. It's time.

This is how I start. I put some colored fabric onto a heavy-duty interfacing. On the back (since so many of you asked) I stick extra stabilizer because I don't use a hoop. Square art in a round hoop is just not logical for me. ; ) The backing stabilizer is Sulky Sticky +. It's adhesive. You peel and stick. It's acid free (***very important for longevity!!!). I don't need to apply heat to secure it, and I don't need to submerge in water to make it go away. It's tear away and tears easily, yet it's tough enough that it doesn't fall apart with repeated needle punctures. I found it quite by accident. The store that I first taught at was closing out of the sewing end of the business. I saw this roll on clearance and thought I'd give it a try. I've been quite happy with it. I've used up a roll and a half already on just the little threadpaintings I do. I have learned to add an extra layer at the horizon. Puckered sky makes me want to cry.
 |
| detail - Jackfish Hills, 2013 |
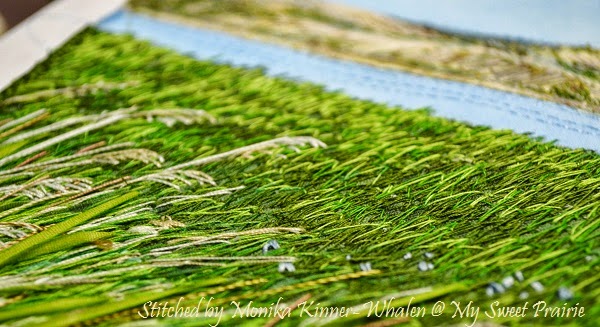
I stitched and I stitched and I stitched some more. I started by free motion machine 'threadpainting' and then finish with handstitching. I added the little blue flowers, more grasses and grass heads all with 12 wt threads by hand. If you look close, I added some hand dyed 2mm silk ribbons as well. They make such great grasses with their flat blades. I love the way it turned out. I love that I kept going and kept going. That foreground really came alive.
 |
| Hills at Jackfish, 2013 |
The photo does not show off the sheen of some of the threads. It's a weird lighting in here today no matter how I set my camera. There are brass colored rayon threads in the grasses too. The texture is terrific! I have some stray threads to clean up and then it's good to go. *This one is being held for someone FYI.
I have to say Thank You all so very much for the comments on 'Autumn Blonde'! That's fantastic. You all sound so thrilled and that gives me so much energy and gusto to jump into the next challenge. From the bottom of my heart, thank you dear readers!
One last thing - there's only a week left before the big workshop c/o Shirley's Sewing Room in Moosomin!! Are you coming? Here's what the plan is:
Day 1 - Threadpainting
- morning: brief lecture w samples, set up, practicing with lots of direction / troubleshooting
- lunch
- afternoon: project and doorprizes! followed by sharing/show & tell
- pm: shopping night for us only at Shirley's store.
Day 2 - Creative Quilted Postcards
- morning: introduction, show & tell, themed cardmaking
- lunch
- afternoon : challenge techniques
- show & tell, swap info & display options, farewell.
What Participants need to bring:
- A variety of colored threads. Any type you like. Any make. Solid or variegated... just bring a mix.
You will need some thread stash for both days: to practice threadpainting and to stitch your postcard art.
- Scissors. Bobbins. Needles. Pen or pencil would be great if you want to add to the handouts.
*If anyone has a portable light box to bring that would be great! I have one and Shirley has one, but this is a big class.
Other than that, you have no shopping to do. Everything else is in the kit fee or provided in the classroom. Are you nervous!? I am very excited... making a list and checking it twice. : )


13 comments:
This one's lovely too. :)
And thanks for the tip out Sulky Sticky. I've been using a hoop lately, but as you say - square piece in round hoop is weird and so I have to tack on a lot of extra fabric which I remove later to make it work. Not terrible on my large pieces but a pain on the 8 x 10's.
Recently, on small pieces I've been using flexi-fibre as my backing - no stabilizer or hooping required, but it's so stiff it wouldn't work on large pieces. Since you mostly work small, you might want to give it a whirl!
I'm wondering if you sell your kits to non class members? I would love to try some of the threads and ribbons you use, or possibly suppliers? I've never thought of using silk ribbons...
I was thinking that if there was a way to make raffia more flexible it would be great stitched into these landscapes....
Thanks for sharing your tips. I'm just starting another landscape and I'm so glad to know about your stabilizer. So appreciate your willingness to share with us.
Obrigada por mais esta aula! O google tradutor atrapalhou um pouco mas uma amiga traduzirá para mim.
Bom fim de semana!
Um abraço!
Egléa
Thanks for this one class! The google translator fumbled a bit but a friend translate for me.
Good weekend!
Hugs!
Egléa
c est genial merci monika
beautiful...I love the grasses. Thanks for info on how you make these...I love the long stitches you do on the machine...how do you do this- I can't imagine that it is by pushing and pulling the fabric really fast under the needle!!
Thank you for more info on your process. I haven't liked using a hoop. I will add more stabilizer and hopefully get rid of those nasty puckers. Your new piece is wonderful!
Now I must look for the Sulky sticky too! I'm curious. If it's tear away, do you tear away the pieces behind the water and the sky, the unthread painted areas, or do you leave it?
As usual, it's lovely!
Thanks for sharing your steps. I have loved your work but wasn't quite sure about your process. I love hand work so am planning to try your steps on some pics that I have collected from New England and Minnesota. Thanks again. gjeneve@gmail.com
I suppose you don't have to, but I do remove it. :)
There are a lot of long hand stitches in the machine work. I blend it all together until it looks the way I want it to. I don't like short quilting stitches in an area of long grasses. I really try to have the fibres visually represent what itvis I am working on. :)
Chech the sponsors I have on the right sidebar. Aside from gifts and garage ssles, this is where I get my supplies. :)
That sounds like the name of the stabilizer I use in postcards. Is it like that Kit? My threadwork is too dense and I pucker that stuff all the time (if that's the stuff). Curious...
Post a Comment