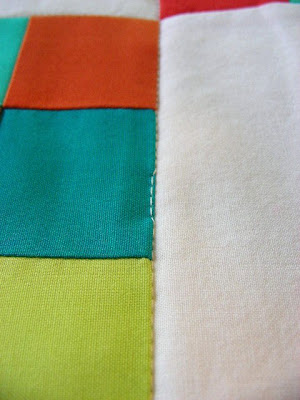
I will start out with my couple of tips, and you add to the list.
Tip #1 - After pin basting, I stitch-in-the-ditch between all blocks. Stitch-in-the-ditch refers to stitching into the seams so that the stitches are sunken. Then I remove the pins and move forward with the more decorative quilting, whether it is free motion or straight line top stitching. I really prefer having all those pins out of the way so I can go for it.
Tip #2 - I have a ditch quilting foot, but I don't like it because it isn't an even feed foot. (They do make those too!) There's nothing worse than getting to the end of a line of quilting to find that all the layers have shifted. So, I stick with my trusty accufeed foot. On occasion the needle ends up popping out of the ditch. I used to seam rip it all out and start again until I learned this cool trick from Pokey on a Quilting Arts video. Check it out:
 |
| now you see it |
 |
| now you don't! |
Pretty crafty I think. I love sharpies. : )
What tips would you like to share about quilting? Leave them in the comments!
Thank you so much,
~Monika


13 comments:
Just stopping by to remind you to get some sleep. Love the tips by the way :).
Stay inspired!
Oh!! Great tip about the sharpie! I can certainly use that.
My tip.... I use those little rubber finger tip ( page turners , I think) on a few fingers because they help to move the quilt when free motion quilting, instead of quilting gloves, which I don't like.
I know some people use a "super slider" on their work surface to help for FMQ. I got a great tip from someone in an online guild to build your own 4 ft x 2 ft extension table. I cannot quilt on a little plexiglass tray - it gets caught and knocked out of place. I like BIG work spaces but can't afford a cabinet to sink the machine into. SOOOO - you get a piece of pink insulation from a hardward store. (2x8 foot sheet, 1.5" thick) You score it in half and pop it apart. Then if you stack them, you have 4 x 2 feet at 3 inches high block. That's the height of your sewing machine surface! So you set your machine on the end where you want it and trace it. Cut that shape out of the foam. Last step is to wrap the whole thing in a pretty plastic tablecloth from the dollar store. Just wrap it like a present and use packing tape. DONE. You have a super slider / giant extension table. When your mood changes, you can recover to a new color or pattern. : ) The foam is $20. How's that!? : )
great idea about the extension table! that's another tip in itself!
BREATHE!!
The one thing that I often forget to do when machine quilting. I usually take a breath only when I change hand position. Breathing helps to keep the body relaxed, not to mention that it's necessary in order to remain conscious! ( When I'm reading a good book, I often forget to breathe till I turn the page.
I like the extension table idea. Using a slider doesn't work if you want to keep your feeddogs up for freemotion as suggested by Leah Day.
Could you elaborate on where you cut out for the machine?? How about a pic of yours.
Good Job Monika!!!
Joyce
My tip for machine quilting: ahem...a glass of wine beforehand can never go amiss...or some sort of relaxing drink..... :D
I tried the feed dogs up, it worked. You need to set the stitch length to zero so that the dogs just go up & down. That way they don't pull the fabric anywhere.
Like Rita with Red Pepper Quilts says - straight line quilting takes much more precision than free motion. You can hide crappy free motion in busy fabrics and then wash & dry to pucker it up. Straight line stitching on solids - oh my this was a task! I'll go for the wine! hehe ; )
Use a wad of post it notes and tape them at your 1/4 inch mark for a guide when piecing.
Great tips, thanks!
Let's see for quilting one thing that comes to mind is have lots of thread on hand. I always manage to under estimate the amount I will use in a FMQ design. And I like to load up a bunch of bobbins so that it's easy to switch them out and keep going.
I pile books all around my machine to make a "flush" big surface to FMQ on. Even cheaper than a DIY, but they do shift around, but my work station is also the dining room table, so it works for me, because I can move the books back and forth, as needed. Also the special gloves makes a HUGE difference! Wine makes me make mistakes, so I listen to music instead to help me relax. Oh, and always bring that bottom thread up to the top!
Aweseome. Hey you know the pink foam piece I made weighs nothing. I can stand it up in a closet when I don't need it. It's very mobile. I put some rubber grippy mats underneath so it won't slide.
ps- there's a photo in the next post if anyone wants to see it.
: )
Great tips everyone! This is so fun!
Gloves are huge for me. I have dry hands and have a very hard time gripping my quilts. I use leather gardening gloves for big quilts and quilting gloves for smaller quilts. It makes all the difference in my control over my quilts.
Post a Comment