Ready? Here is how I do it.
Step 1 : Making Bias Binding
You can use scraps, 1/3m - 1/2m of fabric, or 2 fat quarters. Do the math if you want to make sure this will be enough. With 2 fat quarters, I have extra even for the biggest quilt, so I tend to not measure. If you already have strips made, then just measure around the quilt to figure how much you need. Always add extra.
Now make a 45 degree diagonal fold with your fabric and cut along that fold. This cut will serve as your diagonal guide when cutting. If you have a long piece of fabric, then just take a corner and fold down as so, until it lines up with the long edge of the fabric.
Rotary cut it nice and straight before stitching.
Take the cut triangle and sew it on to the opposite end of the fabric to make a trapezoid (looks like a rectangle that is leaning). Use a short stitch length of 2. or less as you would with piecing so that the stitches aren't exposed after pressing the seams apart.
Next, press the seams.
Now you need to cut 2" strips, using the diagonal as your guide. You can leave it open and cut. Alternately, you can fold it up and then cut. You simply need to ensure that the bias / diagonal cut edges always line up. The easiest way to maintain this is to turn your trapezoid so that the bias edges are seen horizontally by you. You will then fold vertically. This is how we usually fold things. If you are confused, then don't cut until it makes sense, or don't fold at all. Here's what mine looks like. The bottom edge of the photo is my bias edge from the diagonal cut.
No you have lots of strips! Each bias strip will be the same length and all the ends will be diagonal, so there's no waste when attaching them. Isnt' that great!? Now you can line the ends up, right sides facing, allowing for a 1/4" overlap. Note the asterix markings for your beginning and ending stitch line.
Using a short stitch length of 2. or less, stitch 1/4" seam.
Continue until you have attached them all (or as many as needed). Then you need to press then entire strip evenly in half like this:
You did it!
Part 2: Attach the Binding
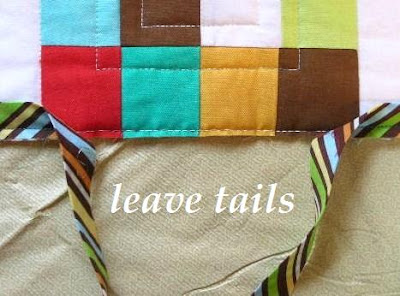
It's helpful to lay the binding all around the perimeter of the quilt, ensuring that no binding seams fall where you will be mitering corners. It's not the end of the world if that happens, but avoiding it will make smooth even binding. Leaving a 25cm tail / 10", line up the beginning of the binding's raw edge with the outer raw edge of the quilt. See photo. Start sewing! Use a 1/4 inch seam so that the binding won't overlap any 1/4 seams on the quilt top, or cover any triangle points you may have near the edge.
There are a LOT of layers here. Take your time. If you don't have an even feed foot with feed dogs for the top, then pin. (In my motherly voice, waving my finger...) Don't sew over pins unless you wear glasses! Actually, just don't ever sew over pins. They can get hit by the needle just the right way and snap and fly and lodge in not-so-fun-places.
Here comes the corner! I like to finger press the binding like this to create a line so that I know when I am approaching the end of the quilt.
See? You need to stop stitching 1/4 inch before this line.
Now keep the needle down and turn the quilt when you get to that sweet spot and stitch off. Mark your binding line if you need to.
Now fold like this, using the angled stitch off line as your guide.
And then like this.
Then turn the quilt and stitch again at a 1/4 inch seam from the top edge, all the way down until you are 1/4 inch shy of the next end. Repeat. You just mitered your binding. EASY.
When you are about 30 cm / 1 foot away from where you started, stitch off. You should have 2 tails like this.
This next part was so hard for me to find. Why is it such a secret!!? There are many methods to joining your binding. This is the easiest, AND most perfect. Therefore, it is my favorite. Check it out. There's no faking here! You cut off tail 1 not any shorter than the half way point between the two tails. Cut it straight. Don't worry, there will be an angled seam.
 |
| yes - the colors changed, but the method is the same... |
Mark a vertical line exactly two inches (or the width of your open binding strip) longer, to the left of the pin on tail 2. Cut vertically there. This will create an overlap identical to the width of the actual strips when they are open. If you use binding at a different width, use that length for this step.
In order to connect the tail ends, you will need to bunch up the quilt for ease. Use quilting safety tips so you can be more hands free. With right sides facing, match up the front corner of tail 1 with the back corner of tail 2. The asterix in the diagram marks the matched corner. Pin.
Draw a diagonal line as your guide, from unmatched corner to unmatched corner. Stitch along this line with the pin to the right.
Clip off the pinned corner, leaving a 1/4 inch seam allowance. Press seam open.
Now lay the quilt edge flat, and the binding should fall perfectly into place. Press if needed.
Now you can continue stitching the binding on at 1/4 inch seam. Just overlap from where you left off.
Now look what happens when you press all the binding back!
Part Three - Handstitching.
Get some good long threads, run them over some beeswax to prevent mangled tangled threads, and put them through a small eyed needle. They hold better that way. Start in an inconspicuous place under where the binding will fall and begin stitching like this. It's called a whip stitch or blind stitch. The point is to not be able to see these stitches. Most of the thread will be under the backing fabric. Space the stitches evenly, and catch only a few threads of the binding fabric. Each stitch will begin into the backing fabric and come out the binding's edge.
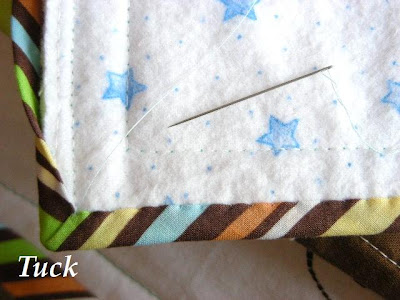
Use a thread color that will blend with the binding. With multicolored binding, just do your best. If they are hidden enough, it won't matter too much. I used pastel blue above and I'm happy with it. When you get to the corners, tuck them in opposite to how they lay on the front. This way the bulk will be evenly distributed.
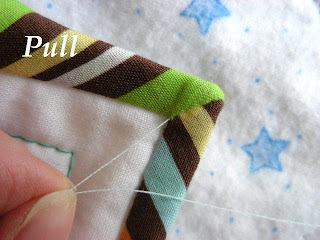
While I'm there, I ladder stitch my miters closed. A ladder stitch tightens like a zipper when you pull it. This is not necessary. I'm not sure many people do it. I definitely would close these miters if I were making wider bindings.
When you end each thread as you go, make a close and secure knot. Stitch back through the binding and out. Pull gently so that the knot pops inside the quilt. Then clip that stray thread right off to make it disappear. Done? DONE!
p.s. This quilt was featured on the cover of A Needle Pulling Thread magazine, summer 2011! : )


