Welcome

* * * Canadian Craft Federation / Citizens of Craft.ca Podcast Series! : ) I'm in Episode #4... but you should listen to them all. : ) LISTEN
Showing posts with label free motion stitching. Show all posts

Tuesday, 26 May 2015

More Stitching Needles

I have been working on this one for a long time.  I got a commission to make the evergreens from Gardenscape.  I had a big 8x10 one that sold as it was being set up for that show.  Then I got an email from someone else asking for it via facebook.  Gotta love Facebook.  So away I went to stitch this.  The first time I did the evergreens, it just happened quite effortlessly and it turned out perfectly lovely.  This second one?   I have been stitching this out for a long time on and off.  It went through the longest ugly phase I have ever had to endure.  I was so close to throwing this out and restarting.  I think the problem was that I began with such drastically different colours of thread - brassy orangy green and blueish emerald.  It was a lot of thread colours before I felt I had it appearing blended properly.  Usually I start with medium tones and then add the deep shadows and highlights.  I'm not sure what possessed me to start the way I did this time.  I think I may have just picked my favourite colours first.  (never doin' that again!)

But - I am SUPER HAPPY.  This is done.  It has so many colours in it and it's all done free machine on straight stitch.  There's no zigzag used.  That's all manually manipulated.  It's a lot of threadwork.

9.5" x 7" commission

This will be heading to Alberta - an old friend from highschool has purchased it.  I haven't seen her in years but she's been following my art on FB.  We used to sit in art class together waaaay back in the early '80's.  I think I have a sketch of her and a couple friends still from those days when we had to do some continuous line drawing samples.  (Waving - Hello Mrs. Deptuch!)

: )

Here is a detailed part of the threadpainting cropped square.


And here is the same portion in black and white.  VERY interesting!


A friend of mine is having her art in the paper for Weyburn ArtWalk & Join the Thread.  She had to see which have the most variation in value so that they are still appealing if printed in black and white.  That makes me want to view all my work in black and white to ensure it's not blaaaaah.  Smart.

Okeedokee.  Off to frame & box it up.  I'm so excited for her to get this!  It's awesome - I've been shipping a lot of work to Alberta lately.

linking to TN&TN and yes - I will be stepping away from that if anyone is interested in taking over that blog.  : )

Have a good day!


Monday, 17 November 2014

Another One Down!

I just finished this up!  I'm pretty happy with it.  It's a commission - the last of the small ones I have to do before the holidays.


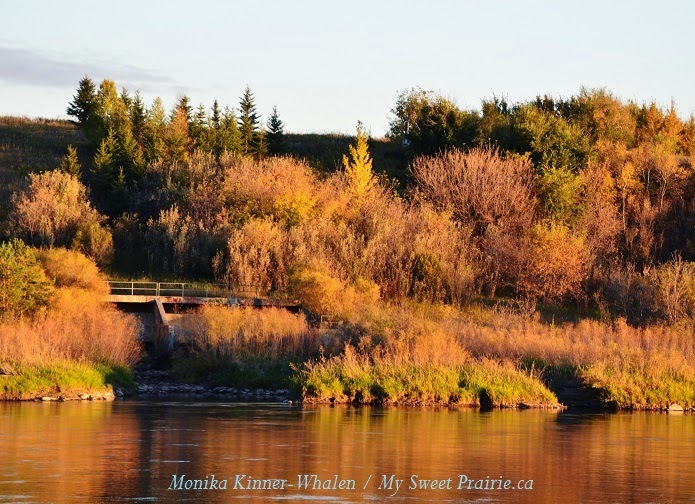
It's based on a photo I took when the sun was setting to my right, and I was facing the other side of the river bank,  It was September and it was gorgeous at that moment.


There was a little walking bridge that I included.  The water was an orange piece of batik that I touched up with some coloured pencils, echoing the reflection of the darks and lights of the shoreline.  Then I put some of the water ripples in with a holographic blue.

Here's the photo from that very cold evening.  Mine doesn't look quite as dulled & peachy as I had my monitor set a little deeper and brighter to distinguish the colours.

view of Meewasin (beautiful valley) banks of the South Saskatchewan River

I picked my bright threads a little brighter, and my muddy colours a little more vibrant.  Now I get to mount it, frame it, and call the client to see what she thinks.


The next several that I'm doing will be very, very green and summery.  Perhaps that will inspire some winter art after the holidays?  : )

Talk soon!

Friday, 11 July 2014

Finished for Friday - See My Process

Gee - it sure was a big reaction on Facebook when I posted an image of my sewing machine 'in action'.  I don't show a lot of process photos because... well... I assume you can see or guess.  I don't have any secrets.  I just collage & sew what I see.  No tracing, no templates, no printing (with the exception of simplifying in order to teach).  I generally place background colours where I want them, and then I stitch it up.  I'll show you what I mean.  Here's a little more process...

loose land-and-sky combinations

I'm working on three 'minis' here.  I'm not working from photos as I usually do.  (That's a big first for me!)  Each landscape will be about 3x3" square.  That's really tough to hold, so I thought I would put then in a row and work on them like this so I have more to hang on to as I manipulate the pieces under the machine needle.

I have piles of fabrics.  It doesn't matter much to me whether they are hand dyes or commercial batiks.  I'm just looking for the right colour for the job.  The placed fabrics are fused onto a tough, stiff cotton weave, and then further stabilized.  I love stabilizer.  I hate puckering.  I use Sulky Peel&Stick exclusively (see sponsor link on sidebar).  It's my favourite.

Then I start stitching.  I put down the thread from farthest point to closes point.  Typically, the distant horizon will have shorter stitch lengths than the foregound.  And so, with my box of hundreds of tints, tones, and shades of green - I begin!  (This is a different trio, bit I thought the photo was clearer.)


I stitch some up.  I stitch some to the side.  This is purely experimental.  I have no idea of how these will turn out.  So far, I've used four different greens.  I pick a few more variations of greens and I keep sewing.  This is all free-motion stitching - sometimes straight stitch and sometimes zigzag.  I've used decorative stitches just for effect when I need a really random look.


Every now and then, I place a working mat on top just to see how the composition is coming along.  These pieces are bigger than what you'll view once it's in the frame.  I need to be sure that the flowers I stitch will be in the scene and not out of the 'margin'.  Using a working mat helps keep it all in balance.

Here I'm adding canola by machine.  I usually do this by hand in my larger pieces, bit this is so small to fiddle with, I find the free motion can get the effect I'm wanting for these minis.


I often 'sew upside-down'.  You are seeing the last image from my point of view while working.  Because I stitch back to front (horizon to foreground), I find that I can see where I'm stitching easier if the piece has it's finished portion facing me, and the unstitched cloth yet behind the needle.

After it's all filled in, I clean up the work.  I adore small, sharp snips that are curved.  My snips MUST be curved.  Too many times I have used fancy-schmancy staight embroidery scissors and damaged the work.  Curved snips are best for me - see how they don't touch or poke or get caught in any other threads?

snip

These are Singer embroidery scissors, and are just like cuticle scissors from the pharmacy.  

One last check with the potential frame and I think it's done.  I like it! : )


And here's another with blue flax.  I may still add trees out on the far horizon.  I'm not sure yet.  There's something beautiful to me about the openness.
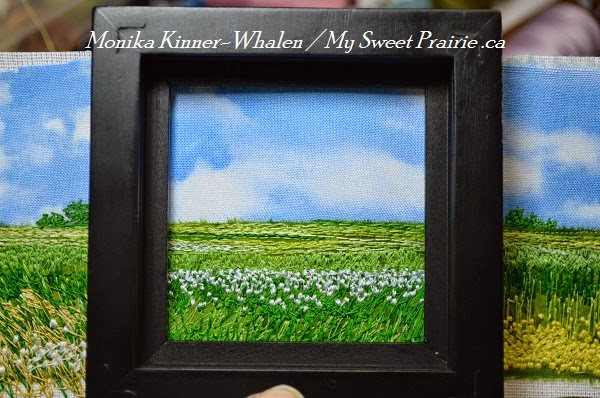
a little flax

There you have it.  I'm not sure which of these will end up where.  Some will go to Handmade House, and some will be stockpiled for Roulleau / Dog River Days Farmers' Market at the end of the month.

p.s.  Isn't the colour great in these photos!?  I'm working at night here with no sunshine whatsoever.  I LOVE the day bulbs and my ottlight so much.  : )

Have a great weekend, and I hope you are enjoying summer!


Monday, 16 September 2013

BIG Thank You!

I just finished a marathon teaching stint at Creative House running all three of my workshops within days of each other.  I want to send a big thank you to my summer helper Kari for putting all my kits & handouts together.  What a life-saver / time-saver!  I was so amazed at the students this round.  Almost all of them traveled to get to these classes.  Some of them drove in for every single class!  There were people from Swift Current, Davidson, North Battleford, Rosthern...  I'm sure I'm forgetting somewhere.  It was really great getting to know you all!  I learned a lot.  I learned a lot about Pfaff sewing machines actually!  They have completely different parts from what I'm used to and I had to do some trouble shooting a couple of times.  It was a bit like helping my teenager with his French homework when in fact I do not speak French.  Fortunately, the machine manuals have English and I was able to guess the solutions. ; )


The last class I ran was the Basic Threadpainting.  It went (in my opinion) way better than the last Threadpainting ones.  I extended the class time and put a food break in the middle.  2.5 hrs was just not enough to practice and get a project nearly done.  This one was 4+ hrs, and just long enough.  Some of us started to get sore shoulders.  That led to a good discussion on yoga, massage, and stretching.  Threadpainting is tough business after all!  : )  I'm sure some readers might think that's weird to hear, but it's true.  It is extremely tedious work and there's a lot of one-position body holding.  * * When I run the 6 hour class in Moosomin I will be sure to incorporate a fun activity as a second break for the afternoon.

i love this black and white work in progress! 

This last class was also quite enthusiastic to get their photo taken.  (YAY!)  Usually when I break out the camera, people duck under the tables!  They know I'll blog it, right?  Thanks ladies - you are so brave.  : )


What a happy bunch!  What a TALENTED bunch!  Even the women who didn't jump into the photo seemed pretty thrilled about their threadpainting results.   /I think the lunch break helped./

original photo by Edith Maracle, used with permission

Look how dramatic the chickadee looks on that royal blue background!  (Nice shading by the way!)  Everyone was surprised at how each person's threadpainting looked to have quite different stitches from the next.  It was good to see. 

As for the last post, WOW!  Keep the comments coming in - the contest isn't over yet.  My goodness.  What a gold mine of information!  I'm eating it all up.  : )  Thank you thank you thank you!

Have a great day,


Tuesday, 23 April 2013

Jour d'ete - FIN

I finished one last piece before my final trip to the framer's last week.  It's super summery.  I was considering a final winter piece but then I realized I had no flax fields for Winnipeg!  I had some photos from last year that I really liked.  This one has blue and yellow, and a BIG view.

flax on a summer's day, 2012

I was good this time, and I made a quick sketch in my empty sketchbook.  : )

my sketchbook rendering

Next, I put together the fabric and thread for the background.  Let's just say that my thread is getting a work out!  : )

i'll clean up later.  i'm busy.

After a day of threadpainnting / free machine embroidery, I'm getting ready to stitch some flax by hand.

French Knots, here I come...


I ended up taking this with me a couple weekends ago to work on it during the public stitching day with the the embroidery guild.  I'm glad I had the photo and sketchbook along, laying out.  As I sat beside it to do stitch, it sure stopped a few people in their tracks.  : )  Here is the finished piece!

bottom corner detail

I had a hard time naming this one too, so I enlisted my bilingual boy.   "How do you say this?  How do you say that?"  I asked him to translate a whole schwack of phrases.  Finally this particular translation came out sounding just right to me.  In English, it means Summer Day.  (phonetically - jshoor daytay)

Jour d'ete, 2013

I love the swoops and swooshes in this big view.  It's a very happy piece, and one of the biggest too!

i love the way the soft gold threads shine in Jour d'ete : )

I have some news too!  I will have one of my Winnipeg pieces published in the Summer 2013 issue of Fiber Art Now magazine.  (You'll have to wait and see which one they picked.)  How exciting!  They had a call for entry on the topic of Flora and Fauna that I jumped into at the last minute.

* * * Also, Jackie White interviewed me for the CQA blog.  It's now up and you can find that post here.  (Thank you Jackie!!)

Okay - back to work.  See you soon! : )


Wednesday, 31 October 2012

The Children Rock It!

I had the BEST time ever teaching kids on Monday at Creative House.  It was the first time I had taught children how to free motion stitch.  I was nervous.  I mean really...  This could be a disaster.  Needles would smash, machines would get jammed... imagine the chaos!  It's challenging enough helping seasoned adult sewists to learn how to free motion sew. 

Boy was I wrong.  

Boy did I underestimate them.  

Speaking of 'boys' I had three boys signed up for "Doodle with your Sewing Machine".  They were all being pulled from school to come to this Monday morning class that I had expected homeschoolers to snap up.  In the end, one boy couldn't come so his sister took his place.  The kids ranged in age from 9 to 12.

My expectations: It will take an hour or more to talk, show examples, guide them through converting the machines to free motion sewing, and do a demo for them before they can began stitching.

In reality: it took them 5 minutes to learn to convert their machines.  They spent the next hour and a half sewing and sewing and sewing some really cool pictures.  NO ONE BROKE A SINGLE NEEDLE.  No machine jammed.  No one had tension issues.  I did no instruction beforehand about coordinating speed of foot & hands... they just went right to it!  It blew my mind.  I went around and gave them tips as they sewed, adjusted some speed settings, and taught them how to pull up the bobbin thread & snip tails.  They were fearless.  It was awesome.

he jumped right in... endless ideas and no fear

I asked them, "do you know how long it takes for adults to get to this point!?  You took five minutes."  One boy shrugged and replied, "Ah... it's evolution."  Well then.  Maybe the little dude has a point.

whipped through pages - they didn't want to stop sewing : )

I showed them some Youtube videos of  'P. Nosa Sewing', which they loved very much.  He's a free motion doodle artist who tours and has a solar powered sewing machine that is also hooked up to a bicycle for power on cloudy days.  You should google that.

the snowman and his train of thought : )

The biggest difference I saw between adults and children was SO clear.  When the kids had trouble, they would stop and say, "what did I forget to do?" or "what did I do wrong?".  Then they would repair the situation, and restart.  When grownups hit a snag, they tend to throw their hands in the air and say, "something is wrong with this machine!"  : )  I think we could learn a lot from the children.

THANKS KIDS!  YOU ROCKED IT.


Monday, 24 September 2012

Skills.

Skills.  You know... everyone needs "skills". : )  Okay, so I'm quoting Napoleon Dynamite.  He's right though.  I happen to be teaching a skills class on Monday, October 1st at Creative House in Saskatoon just on that topic.  (Skills: free motion quilting skills to be exact).

one of my first attempts at meandering

"Free Motion Quilting Skill Builder" is a workshop where you can learn how to understand and tweak your sewing machine for good quality quilting stitches.  You will learn valuable tips to do free motion quilting well and with confidence.  We'll review tools of the trade, and I have handouts with lots of easy exercises for practicing... because you know, practice does makes better.


All you need to bring is your machine (with free motion foot), some thread, and some sandwiches.  Sandwiches?  Yes, Sandwiches.  That is: several 8x10" precut pieces of backing, batting, and top fabric.  Quilt pins & gloves would be handy too, but not necessary.  They do sell those at the store if you need them that day.

Please bring your sandwiches to class.  : )

It runs for about 3 hrs, starts at 10 am, and it's cheap.  $25 with no kit fee.  There are several spaces left in this class.  Call Wendy at Creative House to sign up (306.652.0455) if you are interested.


Wednesday, 25 July 2012

Threadpainting - My Sweet Canary

A long long time ago, Quilting Arts magazine had a challenge to stitch your pets.  I was all over that!  I printed out a photo of Pippin, my Canary.  That's as far as I got.  It stayed pinned to my inspiration wall since then.  I'm sure it's been a year.  Since I'm making class samples up for things I'm teaching in the fall, I thought this would be a good time to threadpaint Pippin as an example for the Basic Threadwork class (like the one I did in Watrous).

My kids (6,9,12) were deeply engrossed in Mario Cart.  I clicked on my sewing machine and thought how simple it would be to hook up my video camera for you to see.  I didn't.  There were two solid hours of laughing and screaming and play by play at the top of their lungs just feet away from where I was and I didn't want to put you through that.  I will make a video this fall - promise!

I had a moment of jealousy, absolutely sure that Anna Maria Horner MUST have a housekeeper, a groundskeeper, a cook and a nanny or two.  sigh.  There's just no way.  (ps- I think she rocks.)

As it turns out, coloring in a photo with thread took no time at all.  I was done Pippin in less than 2 hours (uninterrupted!).  It was super-simple and took only 6 colors of thread.  Trust me, my landscapes done by sight take way, WAY longer.  My point is - basic thread painting is not difficult.  Birds are a terrific subject because their feathers are all laid out for you to stitch.  It's super simple.  Check it out.  First, in no apparent order - bright yellow.

first the yellow - in shiny rayon (Wonderfil)

I'm kicking myself for not turning on my video camera.  Next... a brassy colored rayon.

brass colored rayon added next

Then I added a matt grey cotton, and some white/offwhite too.  Again... it took minutes.  By the way, I'm sewing on stabilized stabilizer because I dislike working with hoops.

My Sweet Canary - Pippin all stitched in.

I finished his little foot.  I stitched in the perch with some variegated brick & brown colors.  I highlighted it with white.  I changed the perch to hide the fact that it's covered in poop.  lol  I did some decorative stitching to help fill up the back.  I wanted to minimize the fact that there are bars behind him.  I like it - it's kind of festive.  This bird took under an hour.  The decorative stitching took about the same amount of time.

Pippin 8x10 - all done!  Click photo to see it larger.

THIS is my favorite part.  I love the details.  : )


Thank you Mario Cart.  Now off to cook, clean, wash, water, & feed everyone, and hopefully throw in a family bike ride too.  :  )  Linking to TN&TN.

Monday, 23 July 2012

Preparations

Summer is nearly half over.   ~shudder~   Before you know it, September will be here.  I'm putting things together for the Showcase of the Arts which is the first week of August here in Saskatoon.  Creative House will be having a booth there and they've asked for their teachers to supply class samples.  I got a little bit done last night.  I think it will be a mug rug.  I really can't stand that name though.  lol  It's as ugly as the word "blog", don't you think?  BLOG.  ick.  Mug-rug on a blog.  ick ick.  So, I'll call it a Coffee Cup Coaster.

Rachel's scraps and some Tutti Wonderfil thread.

Here's a list of classes I'm offering with the corresponding dates.  I picked the Mondays that alternate with our Saskatoon Quilter's Guild meetings so that there's no overlap.  I'll also do some classes at the Studio on 9th in the evenings, and I'm getting booked for some private Sunday afternoon classes as well.  I'll post those once I know.

At Creative House, Fall 2012

Monday September 17 - Creative Quilted Postcards Workshop

Monday October 1 - Free Motion Quilting Skill Builder

Monday October 29 - Teens / Homeschoolers Doodle with you Sewing Machine

Monday Tuesday November 13 - Basic Threadwork / Threadpainting 101 (Rescheduled for stat holiday)

Monday November 19 - Dresdens Workshop

* * * You can read all the details of the classes HERE.  * * *

All of my classes are Monday mornings at 10 am and run for 2.5 to 3 hours, with the exception of November 12th.  Sign up is through Creative House by phoning 652-0455.  They have classes running all the time on so many topics, so check them all out! : )


Tuesday, 8 May 2012

Denmark in Progress

After a long ten days of sick kids / sick me / sick kids / followed by 3 schools day off... I am having some serious withdrawal.  Today I got some headway on the Denmark piece, a commission from Megan in Australia.


A little before (above) and a little after (below)...


I love thread painting.  When I work in long repetitive lines, I like to sew left to right.  This means that I am making these trees sideways.  It always helps my brain to turn the source photo sideways as well.  I'm not very good at thinking sideways apparently : ).  This is how I work...


Looks funny, doesn't it?  That's her photo up on the screen.  I'm pretty happy with the work so far.  It's small at 4x6 inches.  I start with the faded background first, then work forward. Unlike most threadpainting instruction, I don't work light colors to dark colors.  I prefer stitching down the middle or main colors until I have everything in place.  Then I will go back and darken that dark parts to create definition.  Lastly, I'll add the lights or whites for the highlights. 

Yes - I always drop my feed dogs because with this buckrum canvas, it does cause drag to keep them up.  And yes - I always use my Janome 'blue arrow' bobbin case.


It's set a bit lower so that I never need to bother with adjusting the top tension.  Whether I use cotton or rayon, it doesn't much matter.  This set up seems fool proof for me.


Tip- when free motion sewing, always ensure the presser foot lever has been raised BEFORE rethreading a new color.  This way, the upper tension discs are open and the thread will get into the right place inside your machine.


I'm getting there!  I would say I'm about half way done.  The front foliage will be easy now that I have the background and trees in place.  I'm having fun!  I love the way the scene fades into the sunlight.  Thank you Megan for your patience!


Related Posts Plugin for WordPress, Blogger...

* * * Here are some of the most viewed blog posts this month * * *