|
| new Janome blue |
This was a gift from Wendy at Creative House Sewing Centre where I teach. They are new Janome bobbins. What a sweet perk! (Thanks Wendy!)
Aren't they pretty? I like the color variety because I put regular thread on regular bobbins, and specialty thread on special bobbins (100 wt or 8 wt). Now I have clear, pink, and blue.
So, you know I am a huge lover of fabric postcards. I've been making and swapping for a few years now. I even began running Creative Quilted Postcard Workshops which have been very fun. After 2 years as list owner of the PostCard Cottage swap group, I've decided to hand over the reins. Sad news? Not really. I'm now officially back to 'regular swapper' status, which is really great. I no longer need to come up with themes or manage anything. All I have to do is sit back, get creative, and sew. ; ) I just jumped into a swap themed, "Evergreens". I make 3, I get 3. It's been a long time...
I took out some lovely hand dyed fabric from my crazy friend Dahn (haha - yes I just called you crazy!). I fused it on to stabilzer as the sky, and then I stitched down some white raffia. It makes great snowbanks in my opinion. I though I would just threadpaint some evergreens, but then I got this idea...

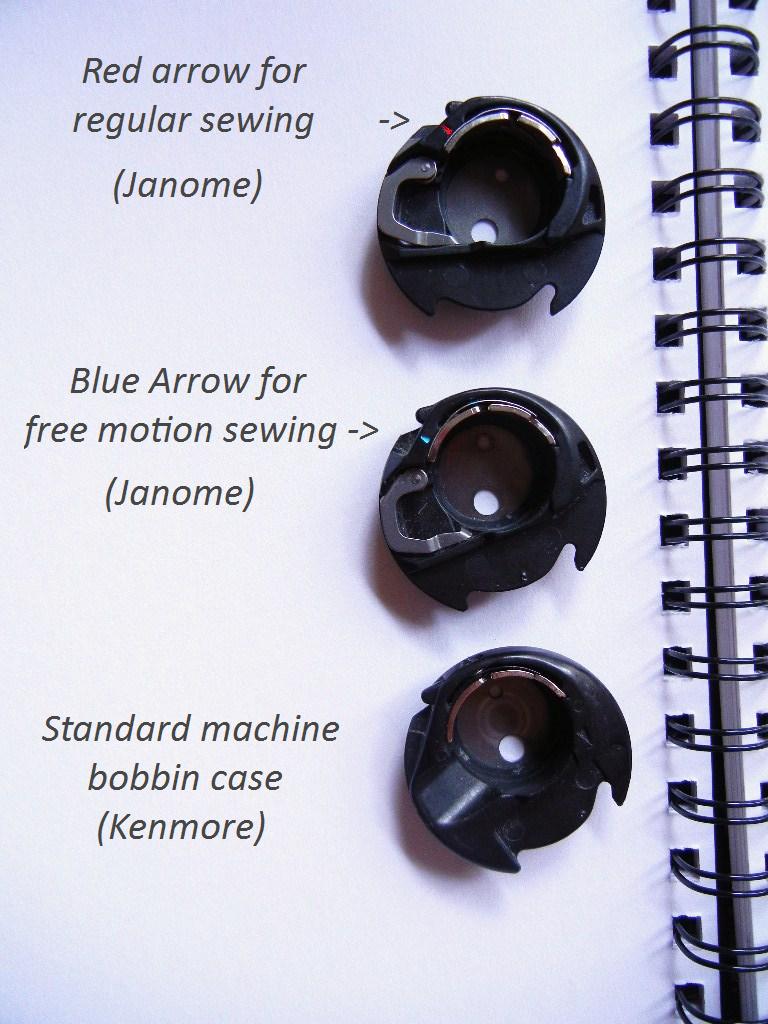
To do bobbin work, you fill a bobbin with thread that would be otherwise too fat for the top of the machine. You'll need to loosen that bobbin case screw first. I have 3 bobbin cases. One Janome 'red arrow' case for regular tension sewing, one 'blue arrow' case that is set a tad looser for perfect free motion quilting, and my hand painted 'green arrow' case that is my mess-around case to set however I want to. This is what I use for bobbin work.

You need that fat Dazzle (8 wt) cord to be able to slip out through the tension properly. The extra case is $25 and worth every penny to not mess up the preset ones. Next step - flip your work face down and start stitching.

I used a regular weight white cotton thread on top, and then I began 'drawing' everygreen boughs. If you use a coordinated thread or a lighter weight 80 or 100 thread, then it will be more invisible. I chose this so that the white would show like snow or frost. See when I flip them over?

Pretty! I love it! I made a few more, and then I began hand stitching little snowflakes all over with a sparkly hologram thread. They are so pretty... here they are prior to handstitching and finishing up the back & edges.

Fun. Add some pretty borders and you are done. I used a variegated thread that ran blue/pale blue/grey. I think it adds just the right festive touch.

I hope you enjoyed the little tutorial. You could make beautiful wreaths this way too! Oh the ideas are endless...
Have a great weekend. If you are in town, I just heard that Creative House Sewing Centre is having an open house with sales, goodies and door prizes all day tomorrow (Saturday Dec 15th). I sure hope my kids are all on the mend so I can go!! Crossing my fingers...